Fought At Frankfurt
2437 days 3 hours 49 minutes ago
Battle Report
3/A/1-18 CAV vs 400th MRR Recon Company
50 POINTSDisclaimer: I use Team Yankee to train Lieutenants. So we adapt the rules to meet training requirements. A few differences.
This battle was actually fought in Fulda, but we did not get it loaded fast enough before the area was fought out.
1 inch = 100 meters (We use max effective ranges per World Wide Equipment Guide (WEG)).
Turn = 10 minutes (More or less)
We use spotting rules, see command decision.
Non moving units get over watch fire.
The LTs have to do a full OPORD and overlay for the fight. We put the graphic control measures on the board. If there is no graphic, they can't do it or are penalized. Cowboys and Indians maneuvering is a no go. However, as part of the orders process, they develop a Decision Support Template (DST). If conditions are met in Soviet turn, they get to interrupt the Soviet player and execute a specific action per the graphics.
Units in Battle Positions are in command regardless of separation distance.
All indirect and direct fires by US forces have to be spoken in doctrinal fire commands and calls for fire or it misses.
Each PL executes his plan while the other two PLs act as the section leaders. Once the game starts all discussions between leaders must be spoken as if on the radio in less than 10 seconds. Failure to do so gets a free enemy indirect mission on top of the offending leader.
Failure to send contact, spot, and sitrep reports per Troop SOP results in loss of a supporting asset for one turn. Nothing worse than losing an asset because subordinate fails to report to PL or PL to Troop Commander.
When possible we get the BN S2 to run the soviets, or the troop XO in a pinch. The Troop commander is responsible for documenting the lessons learned and leading the after action review. I set the scenarios, do the classes, and officiate.
For those that feel this is not in the spirt of the global campaign, please comment. We have no issue if the results are not used or included in the global results. I have gotten some query's over the years on the web forums on how we play. This is an example. Please accept it in that spirt.
Scenario: What follows is the scenario information for the first 3 battles. See other two battle reports
Road to War:
28 July: US President mobilizes 100K reserves. REFORGER begins. US 7th Army Deploys
Soviet units continue field training of all Western Group of Forces units
29 July: Federal Republic of Germany mobilizes. V Corps enters Tactical Assembly Areas and draw ammo from the Ammunition Supply Points. 79th IBCT (11th ACR in real world) on full alert, occupies border positions.
WGF continues training. All German, Polish, Czech, Rumanian, and Bulgarian units leave barracks and move to local training areas.
30 July: 3 AD moves to Brigade forward Assembly Areas. NATO urges all member nations to “take appropriate measures” to defend the FRG. France commits to NATO.
Warsaw Pact units upload 100% live ammo and transition to live fire exercises. Category B and C units in the Leningrad, Baltic, Belorussian, Kiev, and Carpathian Military Districts begin to recall reservists. Aviation units begin maintenance stand down.
31 July: 1 Brigade 3 AD occupies battle positions. NATO counter intelligence reports an upsurge in activity in the FRG and West Berlin.
Warsaw Pact continues live fire training. Begins a major task reorganization that day of higher headquarters. Spetznatz units begin reconnaissance operations.
1 Aug: 1/3 AD continues to prepare defense. All NATO countries mobilize. Hawk belts go to highest alert level. 32nd Anti-Aircraft Defense Command (AADCOM) reports they are ready. 2nd and 4th Air Forces report they are on full alert and begin defensive air combat patrols. AWACS begin 24 hour coverage. Warsaw Pact has lost strategic surprise.
Warsaw Pact executes massive movement of all forces to align with new task organization. It appears Viktor Suvarov was right…. Division Recon elements enter assembly areas on the Inter German Boundry (IGB).
2 Aug: TF 4-32 Armor reports set in the prepared defense. 79th IBCT (11th ACR) deploys FASCAM in the FRG.
Warsaw Pact regimental recon closes on border AAs. Warsaw Pact forces redeploy that night to final AAs.
3 Aug: Warsaw Pact electronic warfare air craft begin normal flights over Eastern Europe again.
040350 Aug: Warsaw Pact forces launch fire strike on NATO. In 10 minutes every TBM in range fires concentrating on nuclear weapon sites, airfields, ADA sites, and nuclear storage areas. Persistent chemical agents strike the Hawk belts, airfields, ASPs, and REFORGER sites. “The Balloon goes up.”
04400 Aug: Frontal Aviation creates multiple air penetration corridors and strike nuclear sites, airfields, and ADA sites. In 3AD sector, one air corridor passes over Bad Hersfeld - Alsfeld - Giessen axis opening up the air space for future air strikes against NATO forces. Both air forces are tied up trying to assert air superiority for the first 24 hours. Dedicated CAS aircraft target FAARPs and nuclear capable artillery assets in the Corps sectors in the morning. Soviet MRLs and long range artillery continue the fire strike, concentrate on suppressing NATO air defenses and long range, nuclear capable indirect fire assets. Selective jamming begins to interfere with AWACs but is strangely quiet on command and fires nets. V (US) Corps identifies 8 Guards Army lead elements attacking to the north of their sector into III (GE) Corps sector at Kassel. 28th Combined Arms Army is attacking into the Fulda Gap with the main axis the northern route to Giessen. Recon elements of the 207th MRD advance in 1/3 AD Sector. One MRR of the 207th bears down on TF 4-32 AR. To the front of TF 4-32 AR, A troop 79th IBCT reports “Contact.”
Soviet Brief: Polkovnik Vasilly Louchnikov stepped from the Division forward command post and thought about his orders. His task was to defeat the 1st BDE 3 Armor Division to allow the division to penetrate deeper into the depths of the NATO defense. However, that was easier said than done. It was an enormous job, like eating an entire elephant. It was not possible to eat it in one swallow, so instead he would have to eat the elephant one bite at a time. That first bite was to rapidly penetrate the US covering force and not waste time or combat power forcing his way to the Fulda River. Instead he had to find a way to bypass as much of the US forces on the east side of the river as possible. That would force the Americans to fight him in a series of meeting engagements on his terms instead of just pushing forward against the US positions and allowing them the advantage of the defense to trade space for time. His reconnaissance elements would have to find that open route and his Advance Guard would follow. If he failed, he would have to create the route, wasting time and combat power. However, if he succeeded he would be in a position to mass overwhelming combat power from an unexpected direction at a time of his choosing to break into the US defenses.
400 MRR operational instructions as read 032300 August 1985 in the regimental command post.
1. Enemy Situation: One tank heavy battalion defends along the Fulda River. One Cavalry troop defends along the border. One mech heavy company is in BDE reserve.
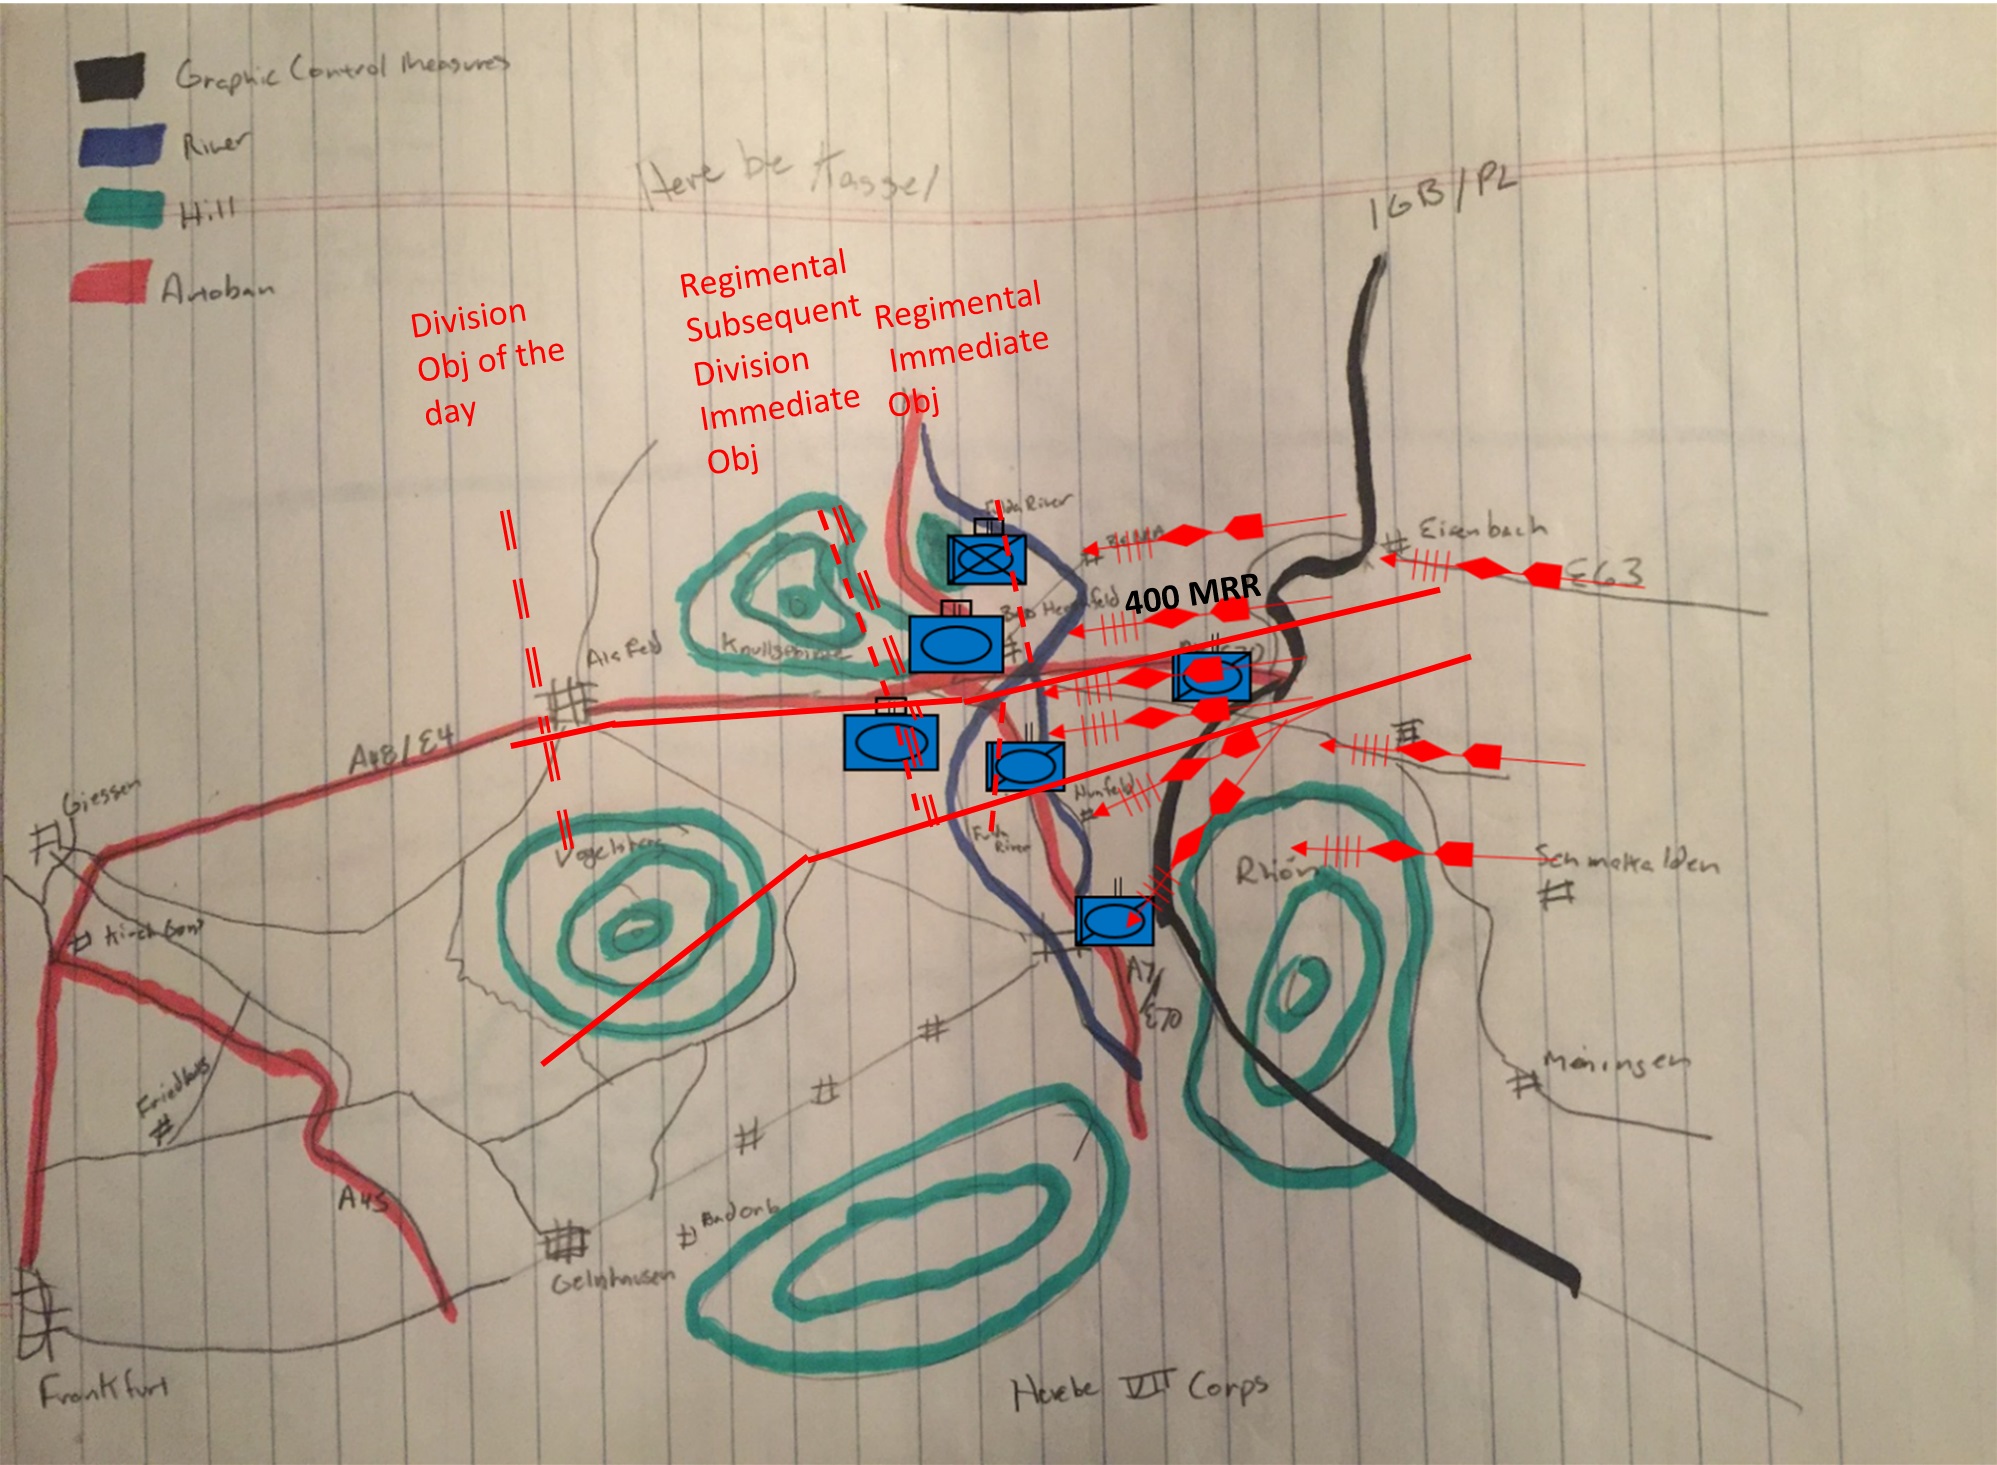
2. Mission. 400MRR destroys the 1 BDE 3 AD to set the conditions for the commitment of the 31st MRR. The immediate objective is securing the far bank of the Fulda River in conjunction with the division desant operation. The subsequent objective is the A7 / A4 highway intersection.
3. Mission of Higher and Adjacent units. 207th MRD attacks to destroy V (US) Corps first tactical echelon, the 3 AD. The Immediate objective is the A7/A4 highway intersection. The subsequent objective of the day is Alfeld. To the north the 41st MRR destroys the mech heavy battalion north of Bad Hersfled. Their immediate objective is to secure the far bank of the Fulda River. The subsequent objective is to secure the A7 autobahn north of Bad Hersfeld to Kassel. In the division 2nd echelon, the 33rd MRR will destroy the 1 BDE and 3AD reserve. Their objective is Alfeld. To the south the 27th MRD division is the 28CAA strike sector. They destroy one tank heavy battalion of 1 BDE in order to cause an early crises along the 1st and 2nd brigade boundary and force early commitment of the BDE and Division reserves. There immediate objective is to seize crossings of the Fulda River. Their subsequent objective is to secure the road network south of Alsfeld along the Alsfeld – Frankfurt axis.
4. Concept of close action. The 400 MRR conducts an attack out of contact with the enemy. The regimental strike sector concentrates the main axis along the route of the supporting desant operation to open the A7 highway to Alsfeld. The supporting axis is to the north. The combat formation will be regimental column to the regimental deployment line. At the regimental deployment line the regiment will attack two battalions on line. The reconnaissance grouping consists of the regimental reconnaissance company, engineer recon element, and NBC recon element. The first echelon consists of the Advance Guard with 1st BN, 1st Tank Co, and 1st Artillery battery. The balance of the first echelon consists of 2nd BN and 2nd Tank Co. The second echelon consists of 3rd BN. The balance of the tank BN is in reserve. The regimental artillery group (RAG) consists of the balance of the artillery BN and 2 attached 122mm artillery battalions. One ZSU 23 section and one SA13 section are attached to the Advanced Guard. The second ZSU 23 section is attached to the main body. The second SA 13 section is attached to the RAG. The regimental anti-tank battery is combined with the mobile obstacle group (MOD) to form the regimental anti-tank reserve. The balance of the engineer company form the mobile support detachment (MSD) under regimental control.
5. I order the first echelon to destroy one of the lead companies of the 4-32 AR BN with one of the first echelons two battalions. The second battalion will fix the other two lead companies of the battalion. The second echelon will be committed once a penetration is achieved to destroy the 4-32 second echelon company, reserve, and 1 BDE reserve along the A7 axis toward Alsfeld in the vicinity of the A4 / A7 intersection. The RAG will suppress enemy anti-tank defenses to allow rapid penetration of the first echelon. Air defense will protect the march column until the bridgehead is reached. It will then protect the bridgehead until relieved by higher headquarters or commitment of the regimental second echelon. It will then protect the second echelon. The anti-tank reserve will defend the bridgehead. The combined arms reserve will destroy any flanking counterattacks into the advance.
6. Preperation times: Reconissance elements begin movement at 0300. The AGMB begins movement at 0400. The main body begins movement at 0500.
7. Control Coordination: Contact with the Desant BN will be handled by regiment and passed to the first echelon on the regimental command net.
8. Command Continuity: The chief of staff succeeds me in command.
US Brief: Captain Cyrus Harrell had been in position with his A troop on the Inter German Boundary (IGB) for days. His job was to detect violations of the IGB and warn the Squadron and Corps commanders where the Soviet main effort was in his sector. Next He was supposed to defeat the Soviet recon elements so they could not find a quick route to bypass the covering force or call for fires as the squadron maneuvered. Finally, he was supposed to get the leading battalion to deploy to force him out of position, allowing the squadron time to concentrate and set the conditions to delay the Soviet attack. But to this point nothing had happened yet. It was 040300 and stand to was in 30 minutes. In all probability it would be another quiet morning, but you never knew if and when “The Balloon goes up.”
OPORDER 5-85 (Spearhead Shield) (GDP)
1. Situation: (See road to war)
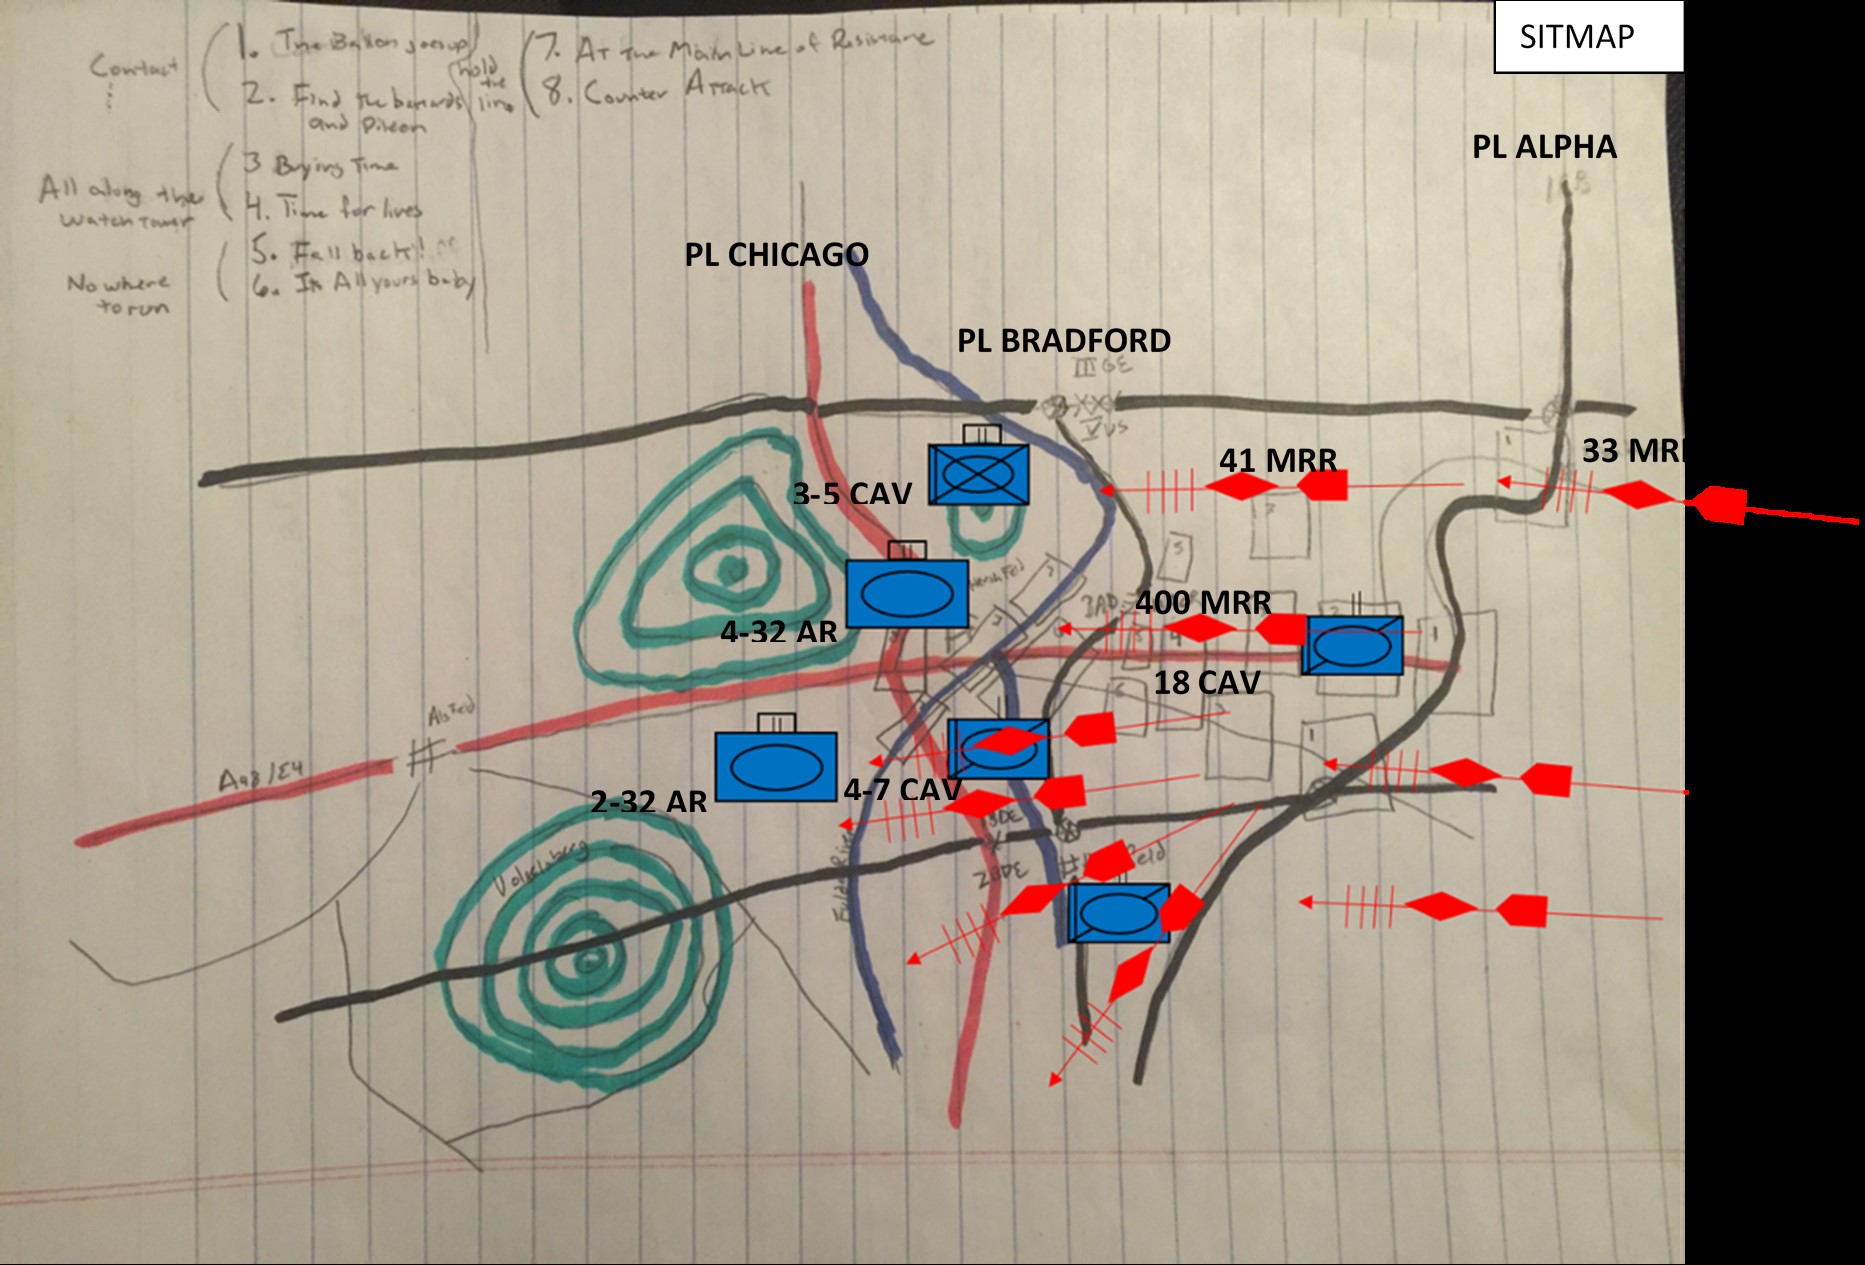
a. Enemy: (See Sitmap)
1). 28 CAA is estimated at 100% strength and the first operational echelon of the 2nd Western Front. It is committed along the Fulda – Frankfurt Axis. To the north the 8GA is estimated to be committed along the Kassel – Koln Axis. To the south the Central Front attacks along the Nuremberg - Stuttgart Axis.
2). In 3AD Sector the 28th CAA attacks with 3 divisions in the first tactical echelon and 2 divisions in the second echelon. In the first echelon 2 divisions are committed against 1 BDE along the Bad Hershfeld – Allfeld axis in order to pass thru the second echelon into the operational depth of the defense. One division is committed against 2 and 3 BDE along the Fulda – Gelnhausen axis in order to fix 3 AD from shifting combat power to the north.
3). In the battalion sector one regiment of the 207th MRD attacks to fix TF 4-32 to prevent the shifting of combat power into the 28 CAA strike sector to the south. One MRR is in the second tactical echelon and could be committed in the BN sector if the first echelon is successful in penetrating the defense.
b. Friendly: To the front 79th IBCT covers from the IGB to the FULDA river (PL Alpha to PL Bradford) in the deep fight. In the security area along the FULDA River (PL Bradford) the division 4-7 CAV screens in sector to facilitate battle hand over with the 79th IBCT. To the north TF 3-5 CAV (-) defends to protect the junction with III (GE) Corps. To the south TF 2-32 AR defends to protect the boundary with 2nd BDE. To the rear A/3-5 CAV is in 1 BDE Reserve. 5-5 CAV is in Division Reserve.
c. Attachments:
1/A/3-5 ADA
D/3-5 CAV
d. Detachments:
D/4-32 AR to 3-5 CAV
2. Mission: TF 4-32 AR defends in sector to defeat the first echelon of the 207th MRD east of the no penetration line (PL Chicago) in order to force the early commitment of the 207th MRD 2nd Echelon.
3. Concept of the operation:
a. Scheme of maneuver: The Task Force defends 3 companies forward, one back in a linear defense in depth. The decisive point is the commitment of the battalion reserve to defeat the attack in sector. There are 3 critical events. 1. Rearward passage of line and battle handover with 4-7 CAV. 2. Defeat of the 2 x first echelon battalions of the enemy first echelon MRR in the forward engagement area. 3. Defeat of second echelon battalion of the enemy first echelon MRR in depth engagement area.
A/B/C companies defend on line to defeat enemy in EA Kill, Smash, and Rip. D/3-5 AR (-) destroys enemy in EA Shred. On order destroys enemy in EA Maim. The BN reserve is 1/D/3-5 AR. Scout platoon man passage points to facilitate rearward passage of CAV. O/O screens south to provide early warning of penetration of 2-32 sector.
4. Service and Support: No Change.
5. Command and Signal: No Change.
This is the same scenario as the previous report A/1-18 CAV vs 400th MRR and 1/A/1-18 CAV vs 401st MRR (Should have been 41st but made a mistake). However in this run thru a different PL presents his plan and executes the mission. He chooses yet a third approach. This is the senior PL in the troop and will probably be moving on soon.
A note on DST development. As in the previous AAR, the LT conducted a rehearsal prior to the game to develop his decisions. While White 1 had focused on movement between battle positions, breaking contact while maintaining observation, and triggers to stage combat power, and Red 1 focused on massing fires, Blue 1 focused on breaking contact and maintaining observation throughout the depth of the AO. He added 2 Targeted Area of Interest's (TAI) and corresponding Engagement Areas. He also task organized into 3 sections of two vehicles, in order to control the flow of the fight. Finally he added a phase line, PL Butch, between Buick and Cadillac to give each section its own AO and act as trigger lines for displacement and Engagement Area deconfliction.

3/A/1-18 CAV (Blue Platoon) Screens from PL Acura to PL Dodge to provide early warning to the 79th IBCT, determine enemy axis of advance, and attrit enemy recon elements.
400th Recon Company of the 400th MRR conducts route recon of RTE Orange and RTE Yellow to facilitate the rapid movement of the advance guard to OBJ Sparrow.
1/A/1-18 CAV
A Section
1 x M113 with .50 CAL (Blue 1 Platoon Leader)
1 x M113 with .50 cal (Blue 5)
FSO Proxied by bazooka team on hill.
B Section
1 x M901 (Blue 4 Platoon Sergeant)
1x M901 ITV (Blue 3)
C Section:
1x M113 with MK 19 (Red 2 Senior Scout)
1x M113 with Mk 19 (Red 6)
In Support: A/143 FA (155mm) (6 x 155mm Howitzers), Mtr PLt A/1-18 CAV (2 x 107mm Mortars), One Section Cobra Attack Helo, One flight A10. 3 MOPMS, One Crater Charge, One Volcano, 2 Hornet Mines.
Soviet
400th Recon Company (Task Organized)
Recon One (commanded by Company Commander)
1 x BRM
3 x BMP1
Recon Two (led by BRDM PL)
4 x BRDM
3 x Motorcycle (Proxied by unpainted RPG teams)
In Support 1 Battalion 122mm Howitzers (3 x Batteries each of 6 tubes)
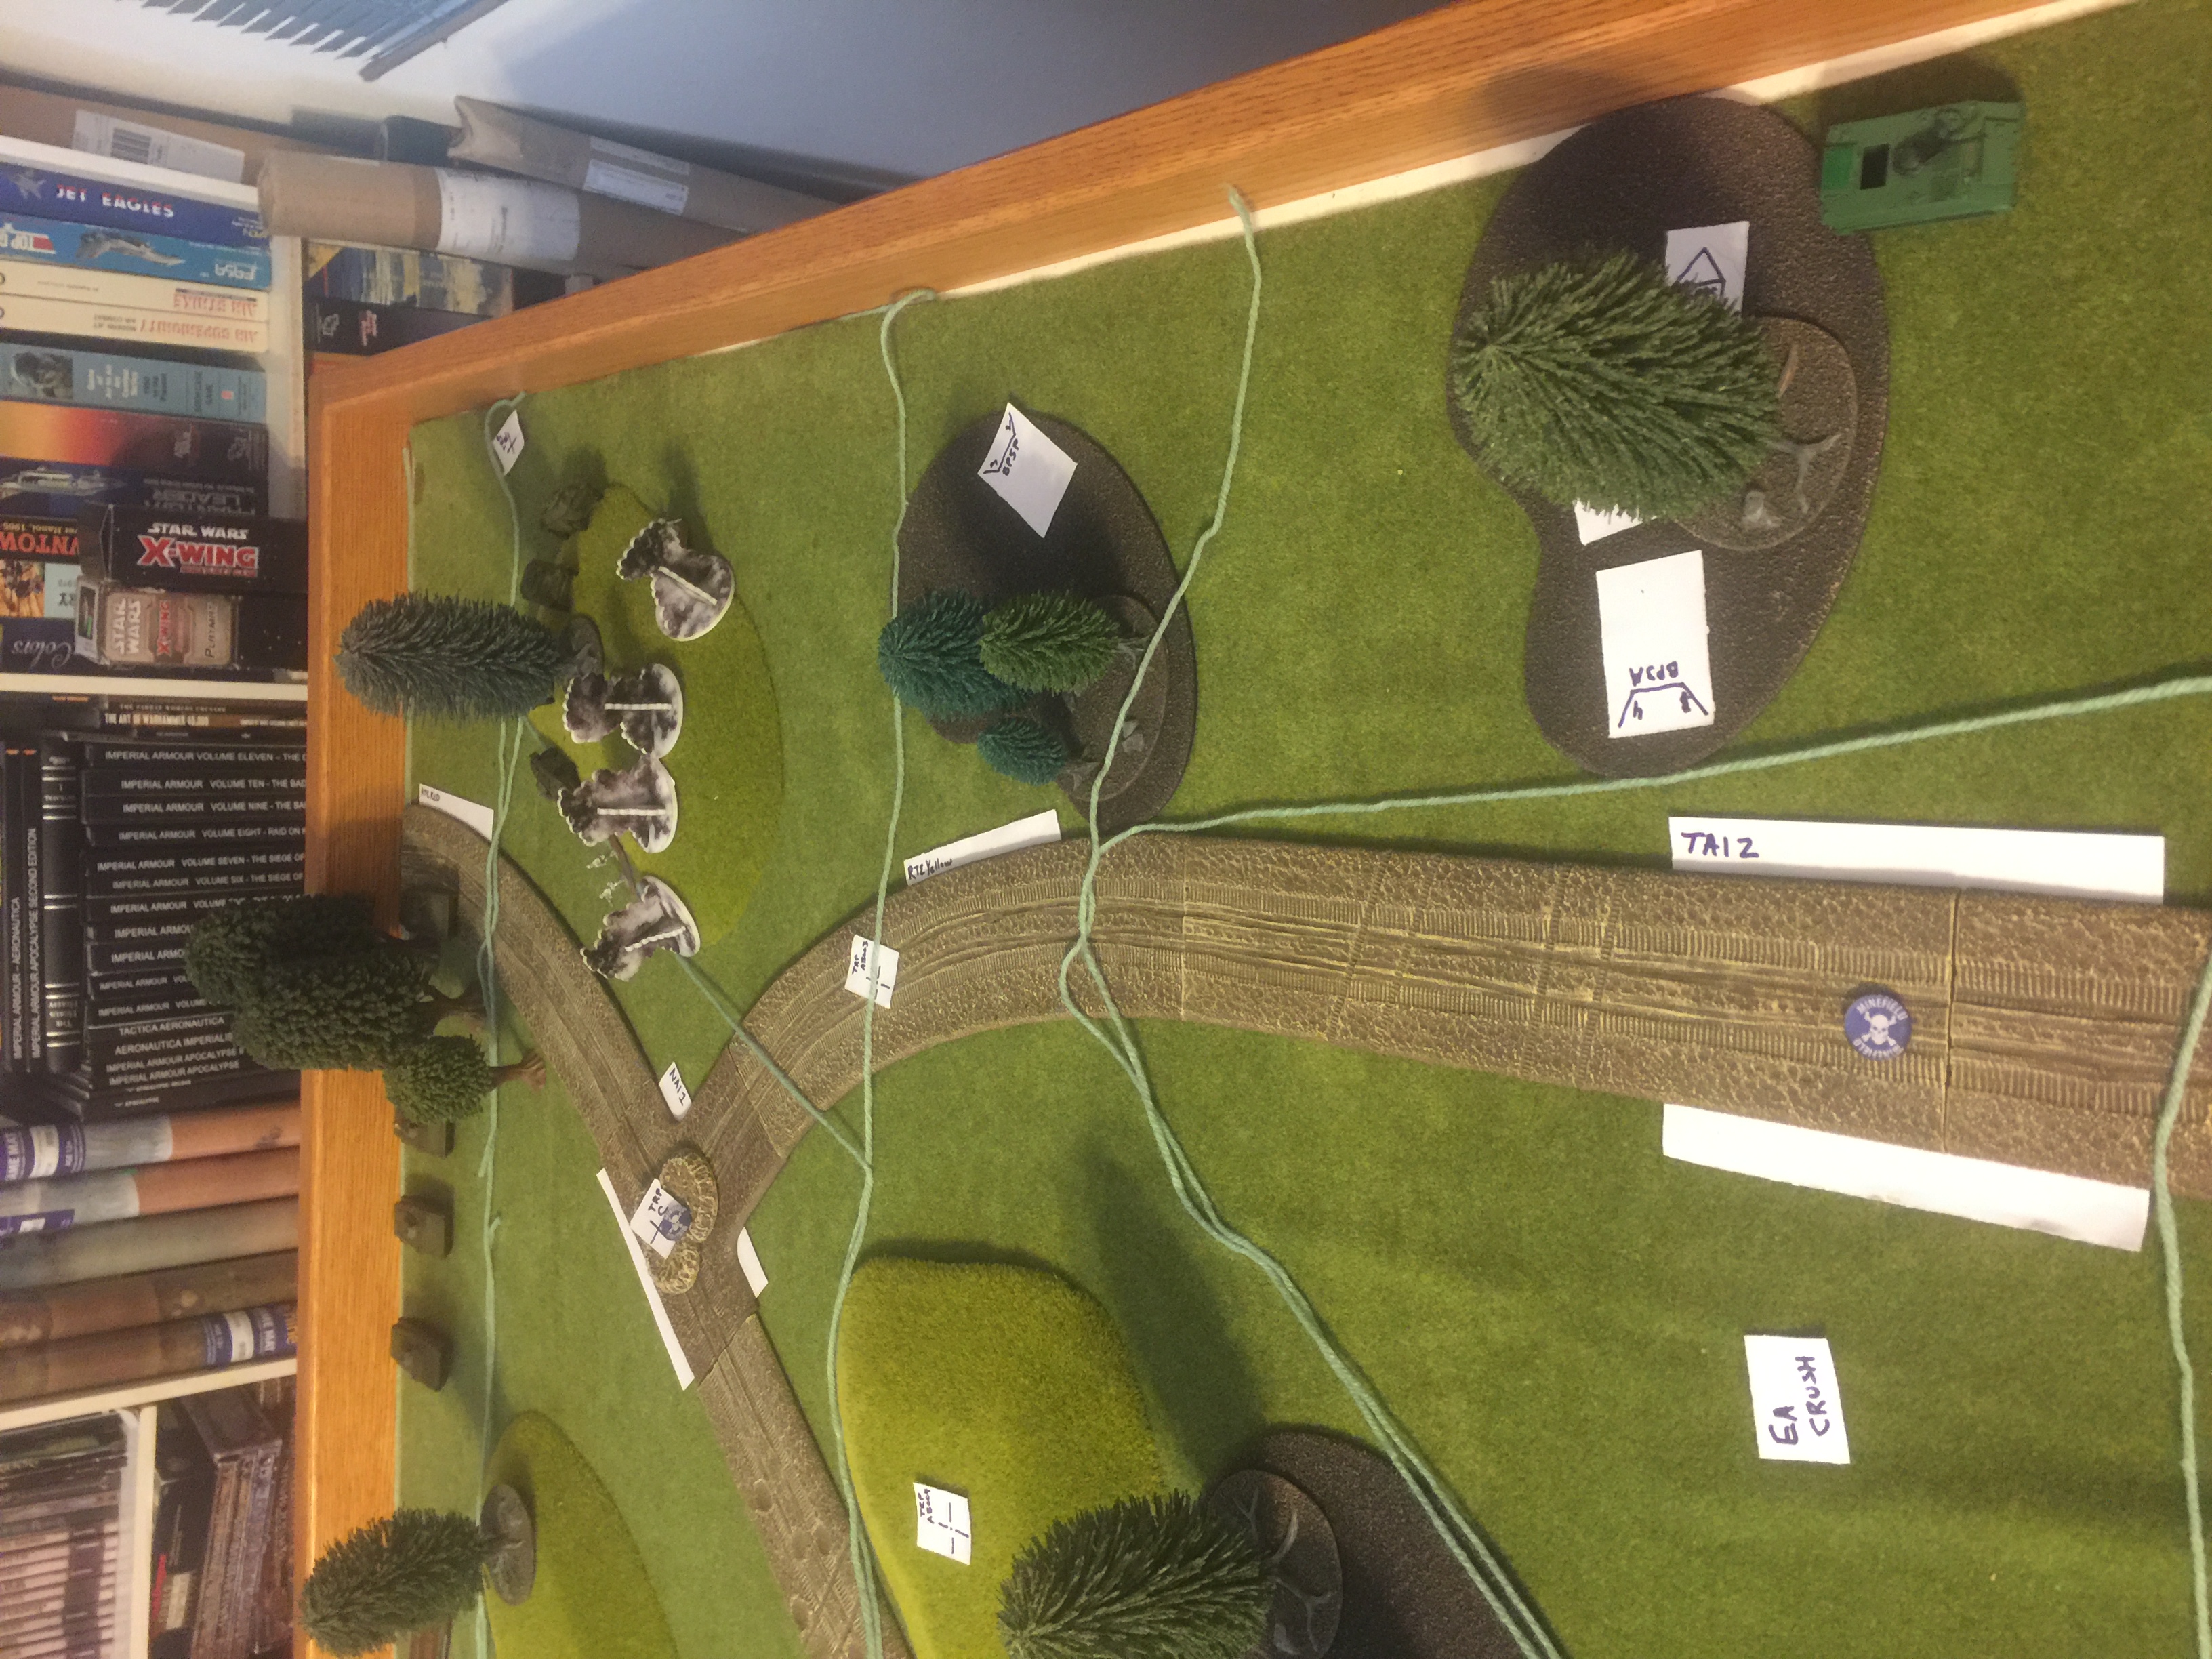
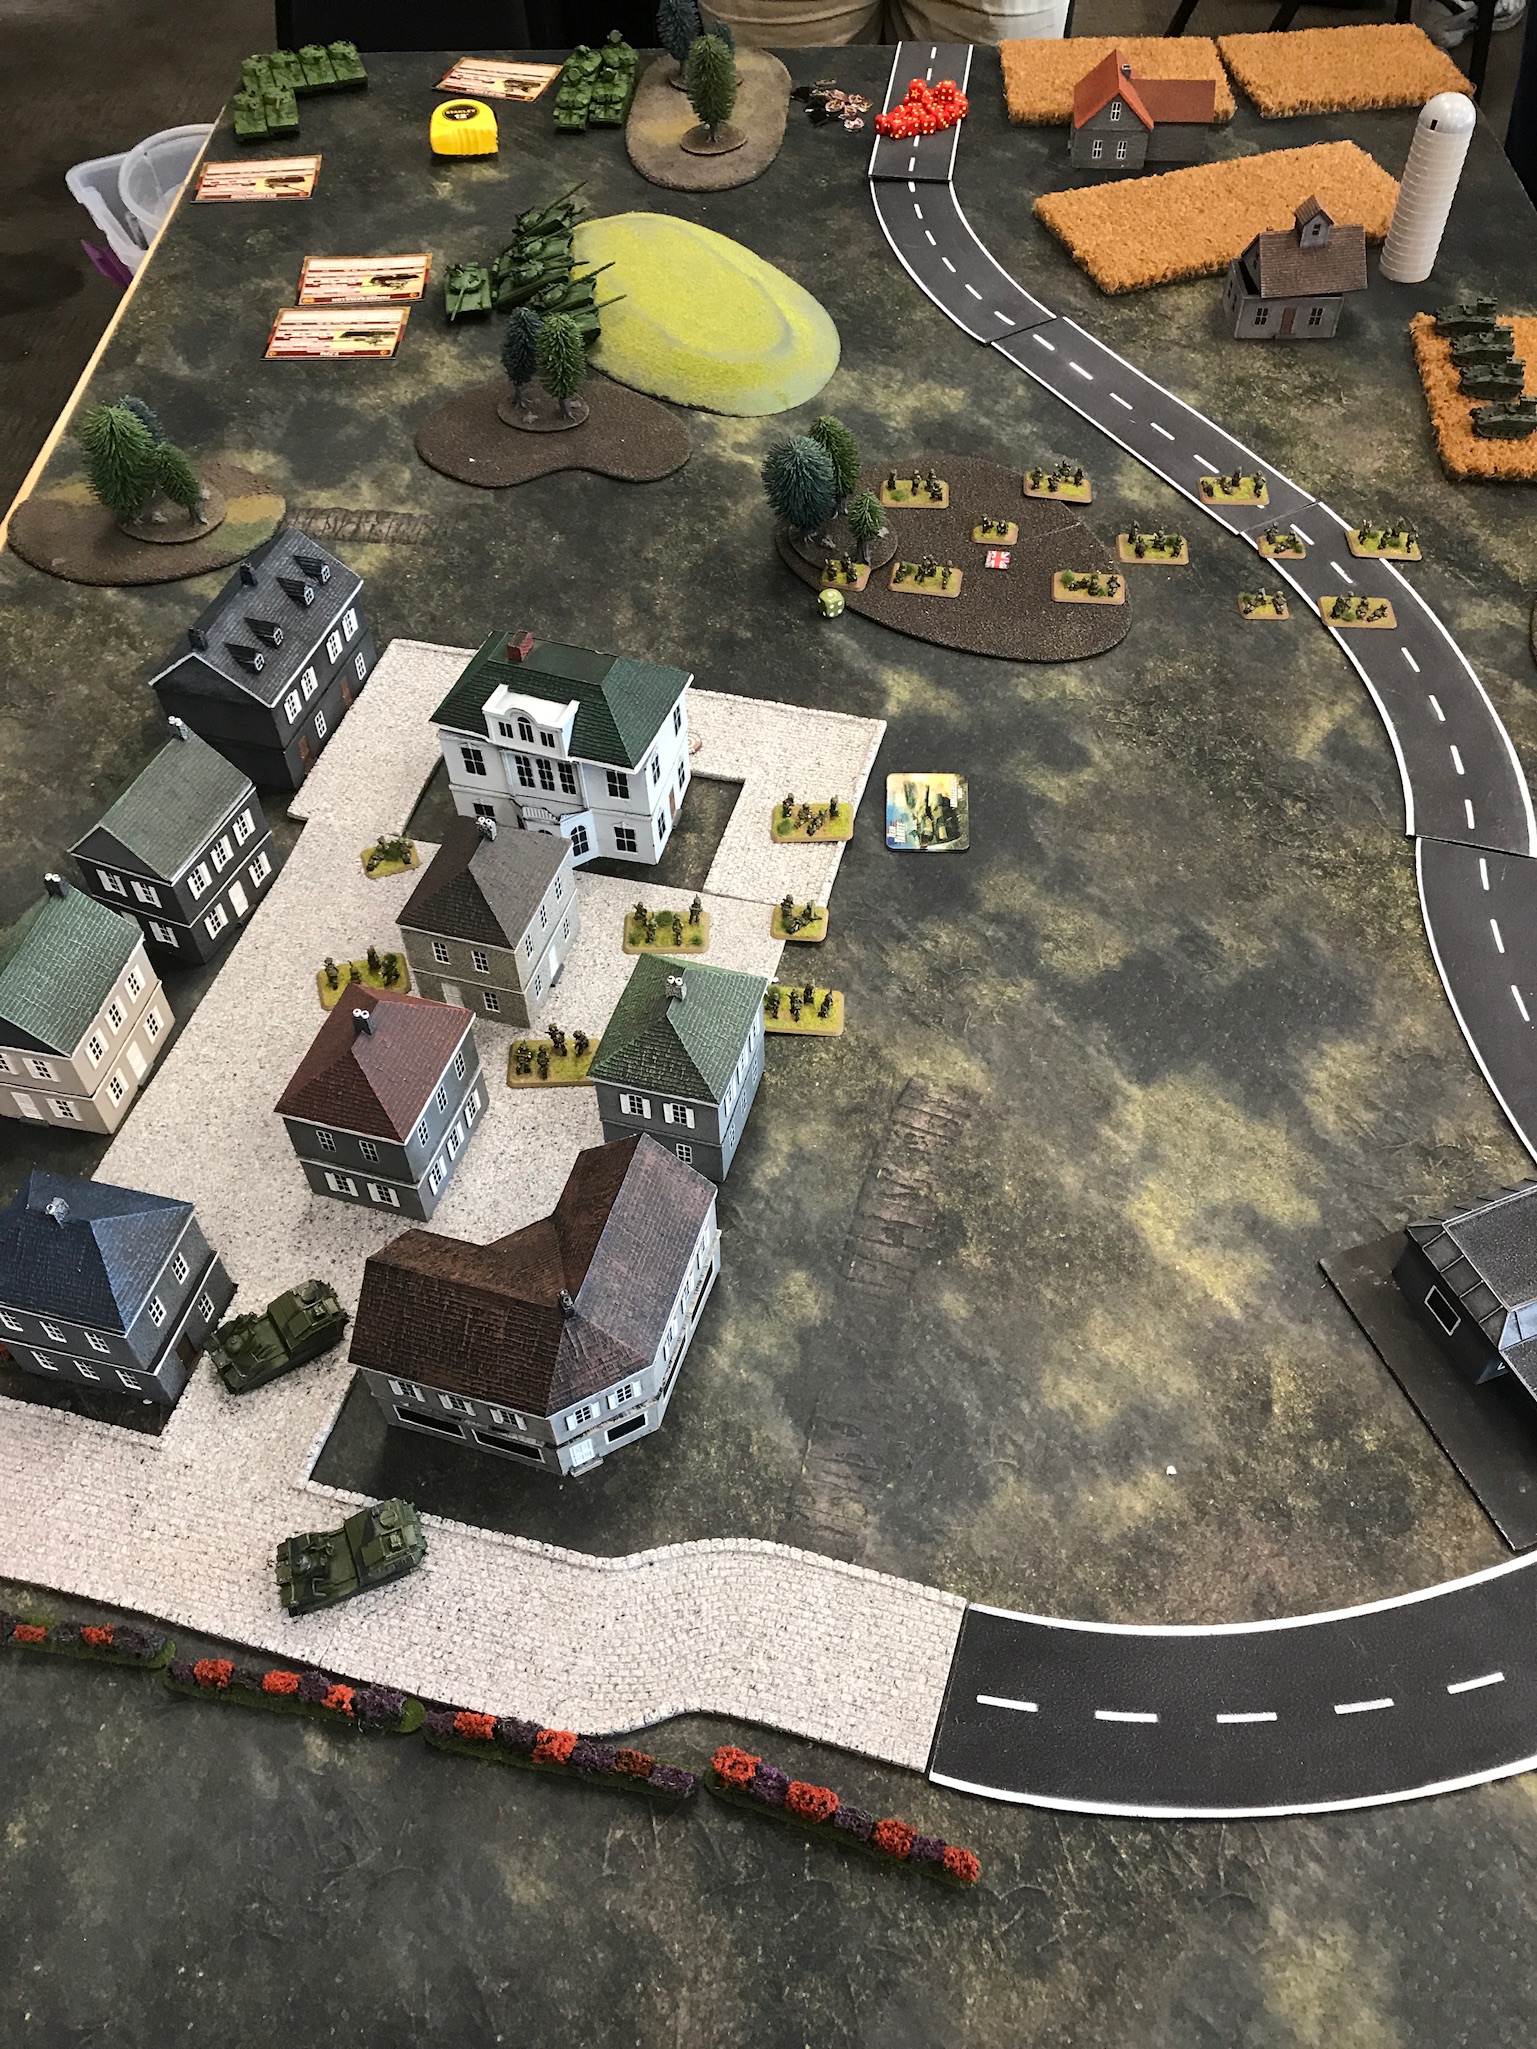
Soviet Turn 1:
Recon 1 moves on board in over watch (Blitz move) Spots crater and barbed wire. Is spotted by US.
DST interruption: Contact report. US calls CAS on station, Helos to BP 1.
Recon 2 crosses PL Acura. Moves to vic TRP 2.
DST decision: Upon entering EA Crush. Smoke nearest TRP, forces between PL Buick and PL Butch move. Southern units Begin move to Alternate Positions (Blue 5 embus OP and heads east), Northern units move to Supplementary Positions (Blue 1 moves to BP1S).
Smoke Mission:
Priority of Fire: A Section
Location: TRP 2
Observer: FSO
Trigger: Displacement of friendly force
Como: Voice Company fires net to Troop mortars
Restrictions: None
Once battery 122mm fires at former location of Blue 5. Nothing in impact area, however US Artillery CFZ is in effect. DST Decision: One battery 155mm Counter fires on Soviet battery suppressing it for balance of game. Soviet down to two batteries.
US Turn.
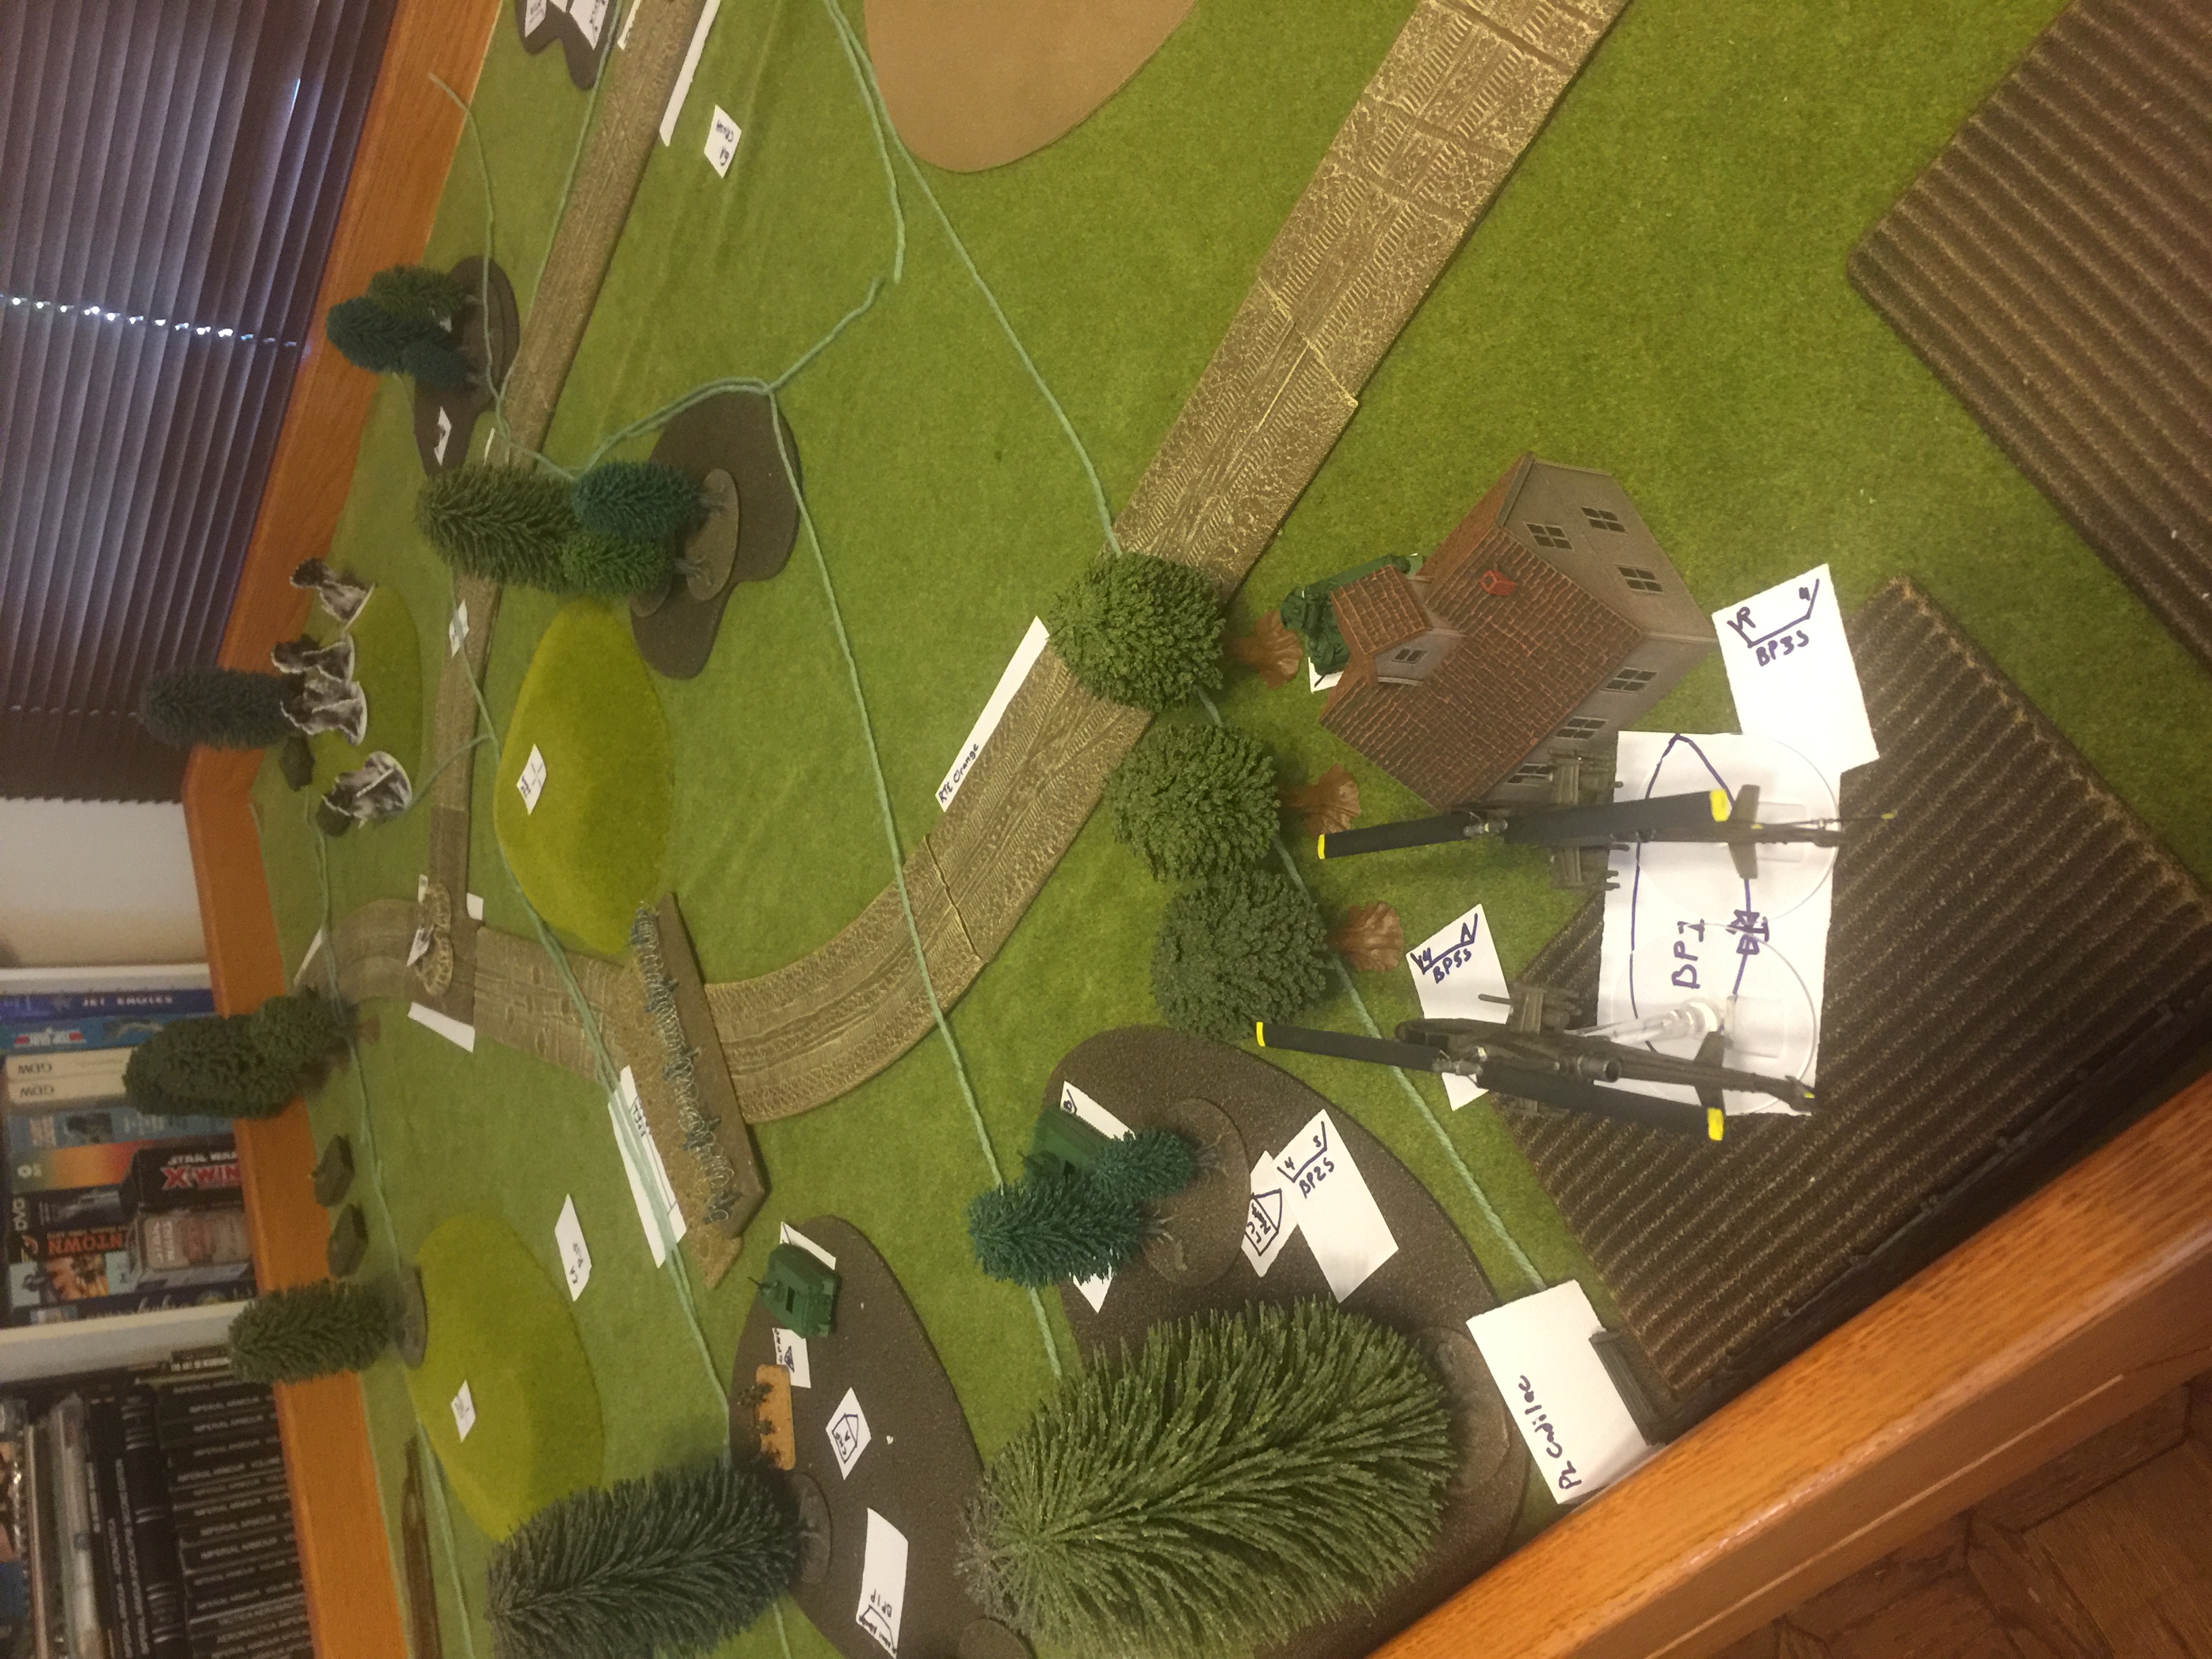
US continues movement of Blue 5 to BP5A. Helos reach BP1. CAS at IP.
Soviet Turn 2:
Recon one Blitz move to Hill. (Out of range of Helos)
Recon two BRDMs move to front of Hill. Motorcycles cross Buick into woods to clear next inter visibility line. One motorcycle spots MOPMs in crater. DST Decision: When Soviet crosses Buick Fire Smoke and move units between Butch and Cadillac to Alternate or Supplementary positions.
Smoke Mission (Blue 2 moves to Supplementary Position).
Priority of Fire: A Section
Location: TRP 2 Drop 1000, Left 400.
Observer: FSO
Trigger: Displacement of friendly force
Como: Voice Company fires net to Troop mortars
Restrictions: None
Once battery 122mm fires at former location vic of LU N. Nothing in impact area, however US Artillery CFZ is in effect. DST Decision: One battery 155mm Counter fires on Soviet battery suppressing it for balance of game. Soviet down to one battery.
US Turn 2: Blue 5 continues move to Alternate Position. 1st Smoke mission lifts. Attack Helos remain at BP1, CAS at IP.


Soviet Turn 3:
Recon 1 moves to just within 2 inches of edge of wooded hill.
Recon 2 moves BRDM into next wood line. Motorcycles move up, to include crossing PL BUTCH.
DST Decision. Fire SMOKE. Upon crossing PL BUTCH units between PL Cadillac and PL Dodge displace to alternate positions.
Smoke Mission (Blue 4 and 6 move to Alternate Positions).
Priority of Fire: A Section
Location: TRP 2 Drop 1000.
Observer: FSO
Trigger: Displacement of friendly force
Como: Voice Company fires net to Troop mortars
Restrictions: None
US Turn 3. Units continue moves to alternate positions and reach them. 2nd SMOKE mission lifits.
Helos shoot at BMPs, SNAKE, 4 BMP, TRP1, TOW, Frontal, At your command. (I really am loath to allow these shots. Wire guided ATGMs hate trees.) 2 BMP killed.
Fire Mission one battery 155mm How.
Priority of Fire: A Section
Location: TRP 1
Observer: FSO
Trigger: On Call
Como: Digital squadron fires net.
Restrictions: None (this should really be DPCIM but the effects of HE are better)
Other two BMPs, including company commander KIA.

Soviet Turn 4. Recon 2 motorcycles move to next two tree lines. Spot second MOPMS when smoke lifts.
BRDMs jump skulk along north edge. (At this point Blue 1 calls the ball and wins the game by reporting Soviets moving along RTE Yellow) (Note: to this point, other than helo's and that was just long enough to get a face full of TOW missiles, Soviet has not seen a single US unit.)
US Turn 4.
3rd smoke lifts.
Fire Mission 107mm Mortar section on Motorcycle north of RTE Yellow.
Priority of Fire: A Section
Location: Polar 1700 mils, 1600 meters from FSO. (FSOs locations are always known locations to FA types)
Observer: FSO
Trigger: On Call
Como: Voice company fires net.
Restrictions: None
Effect: Motorcycle KIA.
CAS calls short of fuel.

The game went 3 more turns. The Soviet stayed south or RTE Yellow, spotted the 3rd MOPM mine and continues off the board edge.
US CAS hit BINGO fuel and went home in Turn 5. The US did not shoot or move again.
Sustain:
1. Intent and focusing of effects can shape the fight. Blue 1 knew exactly what he wanted to happen. He used obstacles and massed fires to push the Soviet down RTE Yellow. He then gave him freedom of movement up the south edge of the AO and killed anything that was north of Yellow to encourage the Soviet to continue in that direction. He had a maneuver plan to cover both RTEs, but a contingency to shift from north to south or south to north depending on which way the Soviet went. Once Blue 1 realized the Soviet had a balanced plan to push down both RTEs, he committed to blocking the north and gave free reign to the south.
2. When shooting starts, reconnaissance stops. Blue never shot and kept one step ahead of the Soviets the whole time. He had the initiative from the git go and never gave it up. Very effective. Also no casualties. His two early counter fire missions put the fear of God into the Soviet player to the point he never map fired again. But since he never had a spot on a target, it was a wasted asset.
3. Not only did he shape the fight down Yellow, he identified this was preferred to Orange because their was only one way off the map for the RTE. RTE Orange has a branch at Check Point B right before it leaves the map. Also he is now in a perfect position to watch the rest of the 400th MRR motor right down RTE Yellow and call fires. The 3 MOPMS mine fields will have to be cleared eventually and that means engineers under fire. Want to slow an attack? Kill the mobility engineering assets of your opponent. In game terms the Soviet will never be able to use RTE yellow at road movement speed. He will have to constantly get off the road at cross country speed to get around the three mines. And yes they were spaced to keep the Soviet from by passing 2 in one move. If he goes to clear it with IMZs or some other engineer, Blue with be watching and call fires, or reseed the minefield with ADAM/RAAMs. (Artillery delivered minefield)
Improves:
1. CAS is a very valuable asset to not use. He did the next best thing by not putting it at risk for a marginal target, but really should have released it after the BMPs died.
2. Task Organization. By layering 3 sections across the width of the AO, Blue intended to simplify mission command. It did not work out that way. Each route needed a leader. Not 3 leaders that could not all see the same situation. It did not show in the game but was definitely a thing in the radio chatter between sections.
3. He did not have a back up OP plan for the displaced OP. Once it got to the new BP Blue 5 just kept his dismounts on the track. Waste of an asset.
Battle Report Author
Recommend Commander For Commendation
Share this battle with friends
JimwesterfieldWins

Like others have mentioned, it’s a different kind of battle report.
I would’ve prefered some more Pictures thrown into the mix if possible 🙂
Nomenclature. It is so natural for me I am not even sure when I am using it. I try to always put the full words in the first time I abbreviate, but if you have a specific nomenclature question, please ask.
This is enlightening! I wouldnt mind a little nomenclature section so I can read up on these abreviations! Very unique battle report.
Very nice. I enjoyed your report immensely.
Love your BatReps
Very detailed. Excellent! I really like the sectors.