Fought At Frankfurt
2407 days 9 hours 23 minutes ago
Battle Report
Roadblock at Hablock
View Linked Report - CLICK HERE 100 POINTSOur second battalion of the 64th Motor Rifle Regiment, reinforced with two small companies of T-64Bs (just received, this was the total strength of these beasts in the division), a small battery of Acacias and the regiment’s wheeled and tracked reconnaissance platoons, formed the regiment’s advanced guard and was tasked this morning with securing the ammo dump or the old OP north of Hablock, to allow passage of the regiment around the British left flank.
Unfortunately, the local NATO force commander deployed a British Territorial Army mechanized company, a squadron of Chieftains, and accompanying recon and antitank assets right on top of our objectives before we even arrived so what was originally to have been a fast run to our objectives, followed by a tenacious defense of them, turned into a hasty attack upon them, at less than optimal odds.
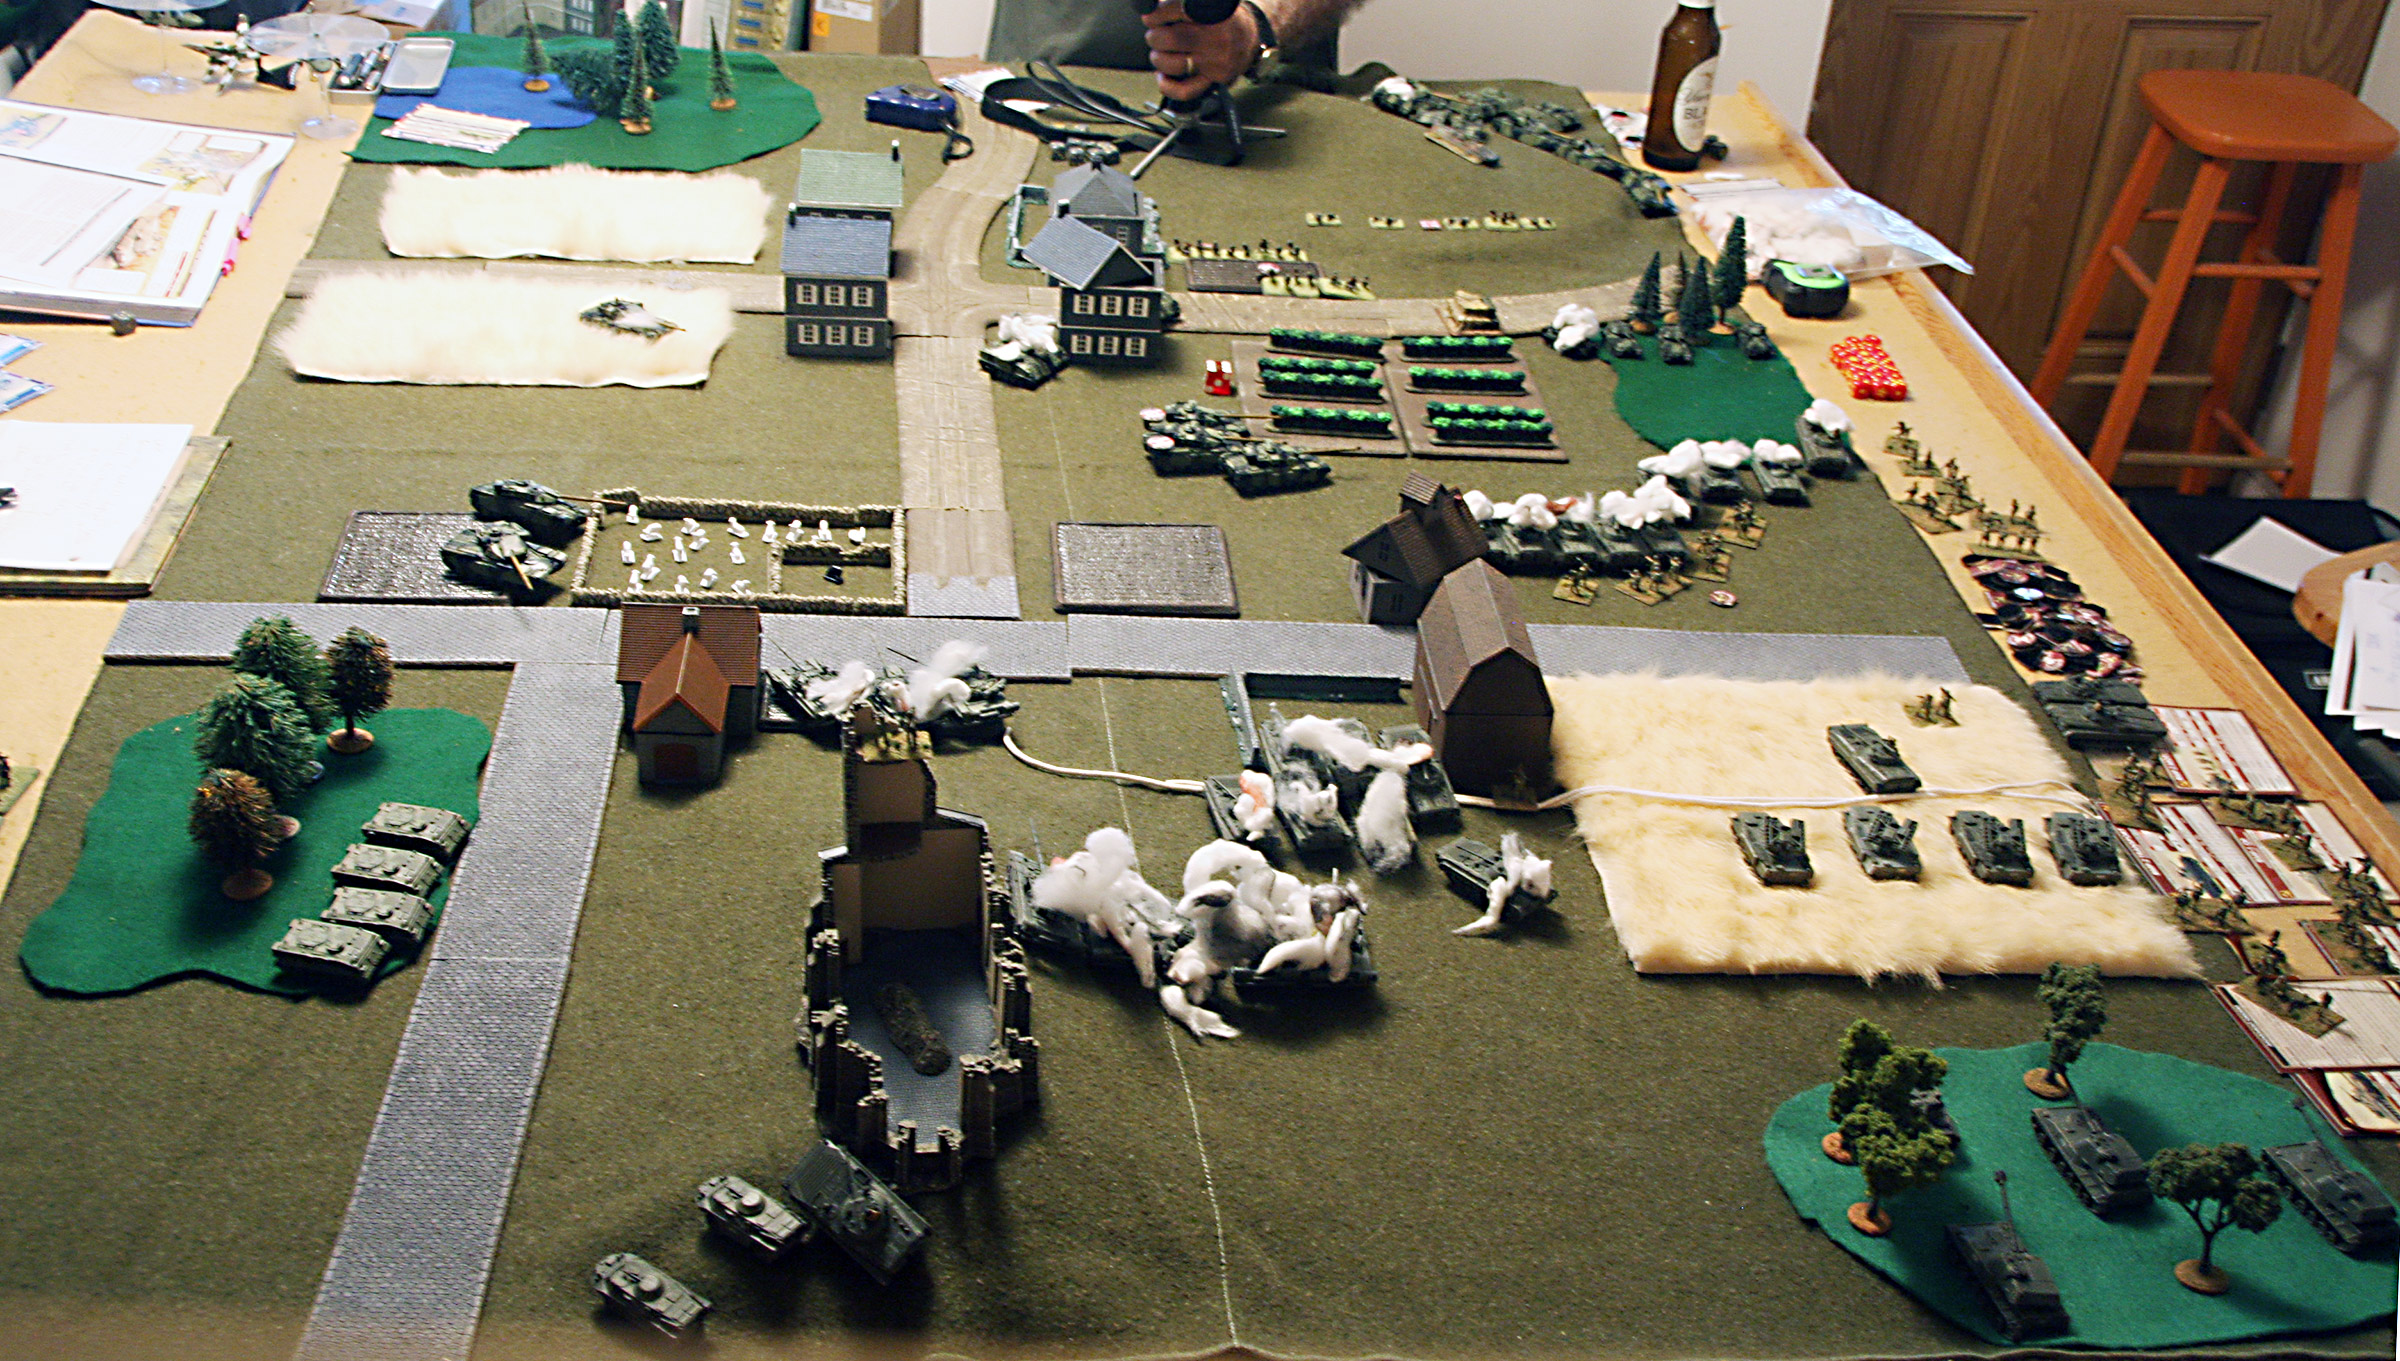
Deploying from our line of march to the right, here’s what the troop dispositions were at the start of the battle.
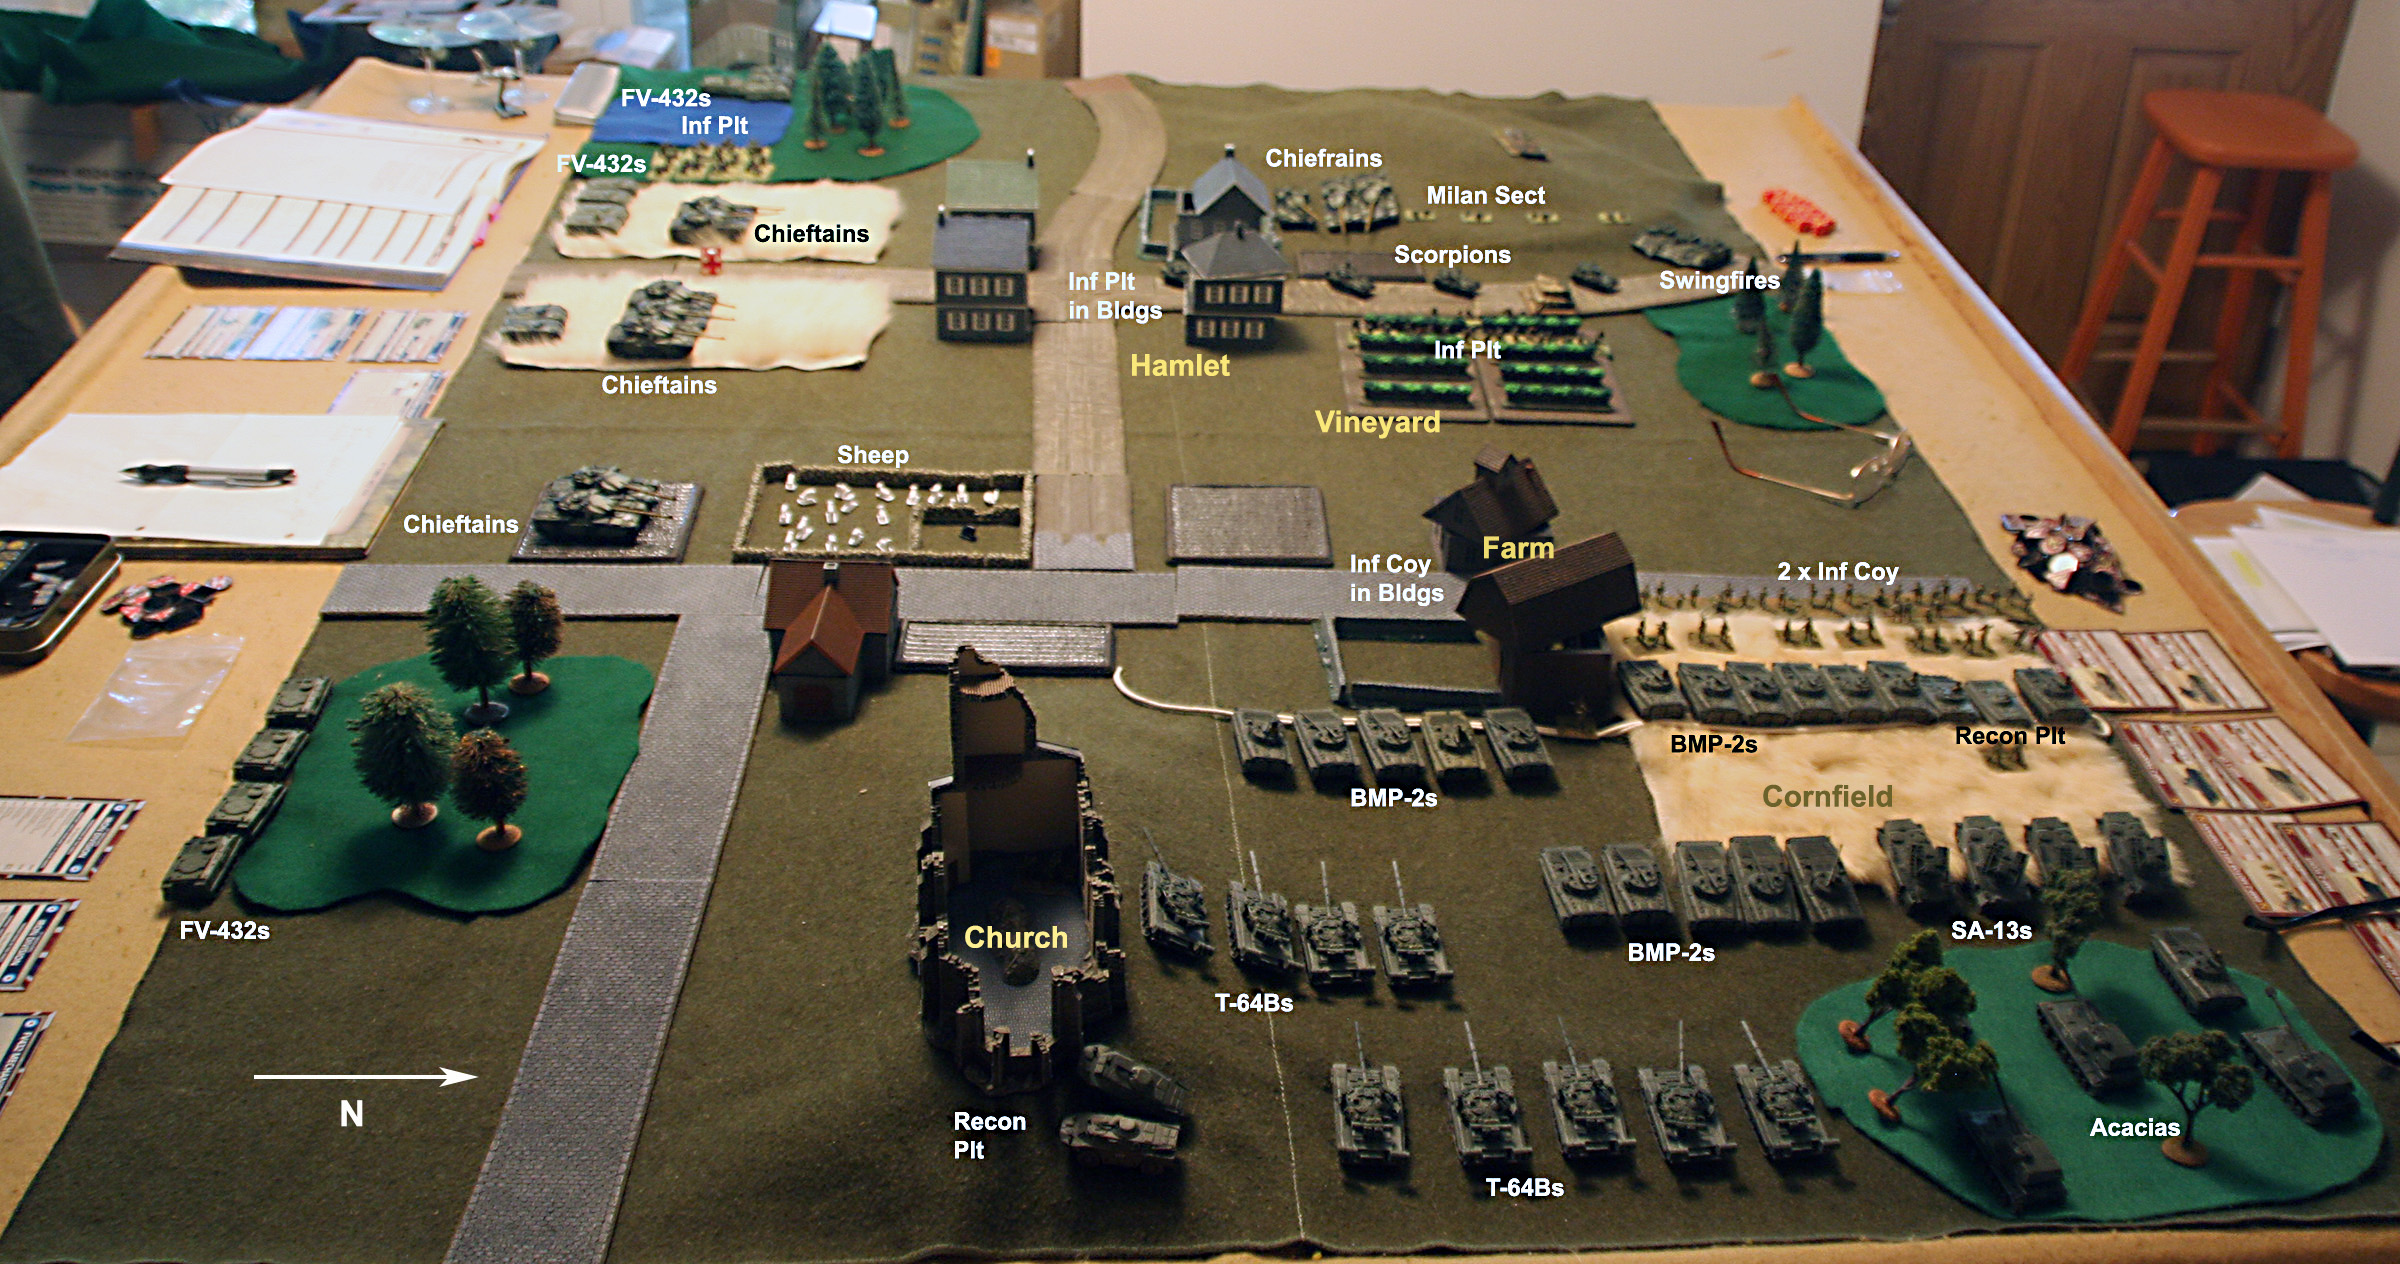
As the advanced guard came into sight of the objectives I was able to see the British commander adjusting final placement of his forces, with two troops of Chieftains arrayed along our left flank, with fire lanes clear across my line of march, a reinforced platoon of infantry occupying the vineyard to our front, in front of the objectives, a troop of Scorpions who’d forward deployed, providing close overwatch, and a troop of Chieftains and a platoon of Swingfires providing more distant overwatch of the objectives. The hamlet was occupied by a second platoon of infantry and my scouts spotted a third platoon moving across the British rear to reinforce the objective area.
There was nothing to it but to attack and trust in superior Russian training and tactics to prevail, so we did.
My two T-64B companies, armed with HEAT and Songster rounds, stood off at optimal engagement range and, advancing into position, opened fire on the left-flank Chieftains, scoring no hits. Two companies of BMPs attempted to swing around the left of the farm into its yard, to engage the Chieftains on the left, but the entire first line bogged down trying to cross the wall, causing a traffic jam behind them. The two infantry companies rushed to the vineyard and the woods north of it.
My artillery engaged the British infantry in the vineyard and remained on them, with variable effect, for the rest of the battle and the BMP line north of the farm engaged overwatching British tanks and Swingfires.
The British struck back, engaging my tanks without effect, but destroying three BMPs in the traffic jam, causing the remaining BMPs in that company to withdraw from the battlefield. Their smaller tank section moved around to the west end of the hamlet but were too far away to engage anybody.
One of my T-64 companies ran up to the building at the crossroads to let me engage more of his Chieftains with my main guns (harder-hitting than my Songsters) and both tank companies fired on Chieftains – with only a couple of hits and no damage!
Right about now a pair of British helicopters flew in from the southwest – they were so far away we couldn’t be sure just what they were and they were, in any event, outside my SAM umbrella. They loosed ATGMs at my BMPs by the farm, destroying one, then flew off, never to return.
The British infantry in the vineyard, meanwhile, attacked my infantry company there, pushing it back slightly. With reinforcement from the infantry company from the farm, my infantry counter-attacked, pushing his troops back across the vineyard into my artillery pattern. While this was going on my northern-most infantry company in the woods eradicated the infantry he had there and with his supporting Scorpions bailed out, attempted to assault them, too. But my infantry was spent and instead consolidated their position. This opened them up to counter-attack which almost destroyed them.
Up to this point, the BMP company and recon platoon in the cornfield continued to engage with ATGMs the Chieftains and Swingfires on the hill, killing one Swingfire and bailing one and also a Chieftain (both of whom remounted).
In the south, the Chieftain troops engaged and completed the destruction of my forward T-64 company, with the sole survivor withdrawing from the battlefield. They also completed the destruction of the hung-up BMP company (which never did manage to un-bog!) and a fourth BMP in the second company. The final BMP from that company gave up on the notion of getting into the farmyard and moved around my rear to support the BRDM recon platoon that was engaging, to no effect, the FV-432s to its south.
The gun duel in the south continued. My T-64s killed a Chieftain but the Chieftains hit and destroyed my entire second tank company.
My infantry holding the edge of the vineyard finally got themselves organized to attack as the BMP recon platoon rushed across the gap to the woods in the north, trying to avoid the attentions of the Chieftains in the south.
The Chieftains promptly hit and killed them all. The BMP company, following slightly behind the recon platoon, were similarly engaged and destroyed.
The BMP with the BRDM platoon fired multiple Spandrel rounds at the southernmost Chieftains, to no effect.
The final act of the battle took place when an amalgamated Chieftain troop assaulted my remaining infantry in the cornfield, killing one stand. The infantry failed their counterattack role and fell back behind the burning BMP line and the battle ended.
The fastest way isn’t always the best way. Kayjay deployed his troops very effectively, completely covering with fire the only quick avenue of approach to my objectives, and I walked right into it. In hindsight, attacking down my left flank, while it wouldn’t have been easy, would have forced his redeployment to cover his Chieftains and I might’ve broken through there. As it was, all of my movement was into the teeth of his defense.
Armor/infantry cooperation is important. My BMP company and recon platoon in the corn field tarried too long because they had targets – the Chieftain and Swingfire troops on the hilltop. As a result, the infantry went into the vineyard without support.
Sometimes a single turn of missing consistently should be enough of a clue to merit a change in plan. When you get that clue don’t ignore it.
What is the most noteworthy thing near the beginning of the following video, as related to the T-64 MBT? Speed! Use it...
Do not attack piecemeal. If my BMPs on the right had moved up with the infantry, the Chieftains on the left would have still been occupied with my T-64s. As it was, they destroyed the tanks, then when the BMPs tried to advance, the destroyed them too.
When you execute your plan well, the Gods of War will favor you and your dice. When you do it badly, they will laugh at you.
Radio transmission intercept from Serzhant Petrov, TC of the BMP south of the church at battle’s end: “Sixty-four Two One, this is Sixty-four Two Four. No vragi in sight except for some transports and a short tank section. We can simply roll them up if you send in the tanks! Sixty-four Two One? Come in please?”
Battle Report Author
Army Lists Used In This Battle
Recommend Commander For Commendation
Share this battle with friends
kayjayWins

Re: Kayjay: My dice have been sent off for re-education. 😉
Nice! Am glad to hear no sheep were injured!
Very nice rep. and valuable lessons learned. As a Brit commander it warms my heart to see Chieftains prevail ..
Bill wont gripe but his dice kind of failed him a few times at the start.
Nice report
Bummer on the outcome – love the table… sheep… heh! I’m going to have to try that…